Using pre-cut fabric packs is a great way to use lots of bright patterns and brighten up your day. Although I used a jelly roll to create this cushion you could cut strips from your scraps to use them up also. It really does lend itself to a scrappy look. When I say I used a jelly roll I in fact only used half. You normally get 44 strip of fabric in a roll so I used 22, simple maths right? Each strip is 2 1/2 inches wide.

You need to start by pressing your fabric, it is important not to skip this step. Once your fabric is pressed you need to fold them in half lengthways and cut. For the next step your life will be made much easier if you have a rotary cutter, trust me once you own one you will wonder how you managed without it. Cut each of your strips in half diagonally. Now your rectangles will be long triangles. Do this with all of the strips. Now you are ready to sew them up.
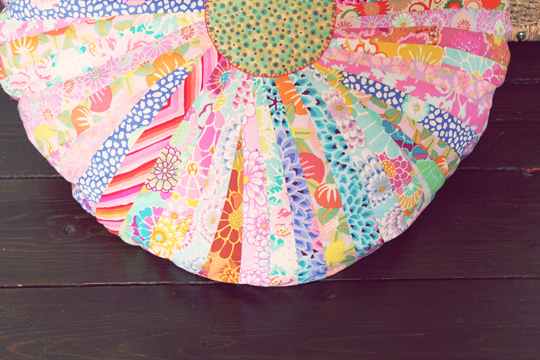
After joining around 10 strips you will need to press the seams, press to the darker fabric. You will also need to take your rotary cutter and ruler and trim either side. Trust me they will all fit together in the end. Once all your pieces are together in a big circle you need to ensure that your circle is in fact a circle. the best way to do this is to press the circle in half and then quarters. Take a length of string and a drawing a pin, place the drawing pin in the centre point and then mark out the outer edge and cut if necessary.
Now you are left with a lovely bright circle. In the centre of the circle I placed a contrasting fabric circle using blanket stitch, this served two purposes. One it covered up any gap in the centre, and two it made the cushion top look like a pretty flower.

Now you need to make the back of your cushion. If you don’t have a piece of fabric large enough you can do what I did and use smaller pieces joined together. Place the right sides of your circles together and stitch a 1/4 inch seam all the way around remembering to leave a gap so that you can turn the cushion the right way round and stuff the cushion. I decided to fill mine with polystyrene beads (bean bag filling). You can choose your own filling. Once you have filled it to the desired squishiness you will have to hand stitch the gap closed so that all the filling stays put. All that is left to do now is enjoy your new floor pillow.

Take Care
Nicolette xo
why_in_the_heck
That looks really cool!
Audrey Fischer
This is awesome! trying to redo my room and this'll be great
JoEllen Gohr
What size is this cushion in inches and/or feet?
Nicolette Lafonseca-Hargreaves
I am currently in Paris so do not have the cushion with me but to give you a rough idea the length of a jell roll is 44inches long so just shy of that across
Laxmi Rai
Wow! looking very nice. Thanks for sharing.
non woven fabric bag making machine
Monica Armando
Can l use old clothes as filling